In the Daily Report area, you can create, view and edit reports for recording quality control onsite visits.
To get to the Daily Reports area, select "Quality" from the top menu, followed by "Daily Reports" from the secondary menu.
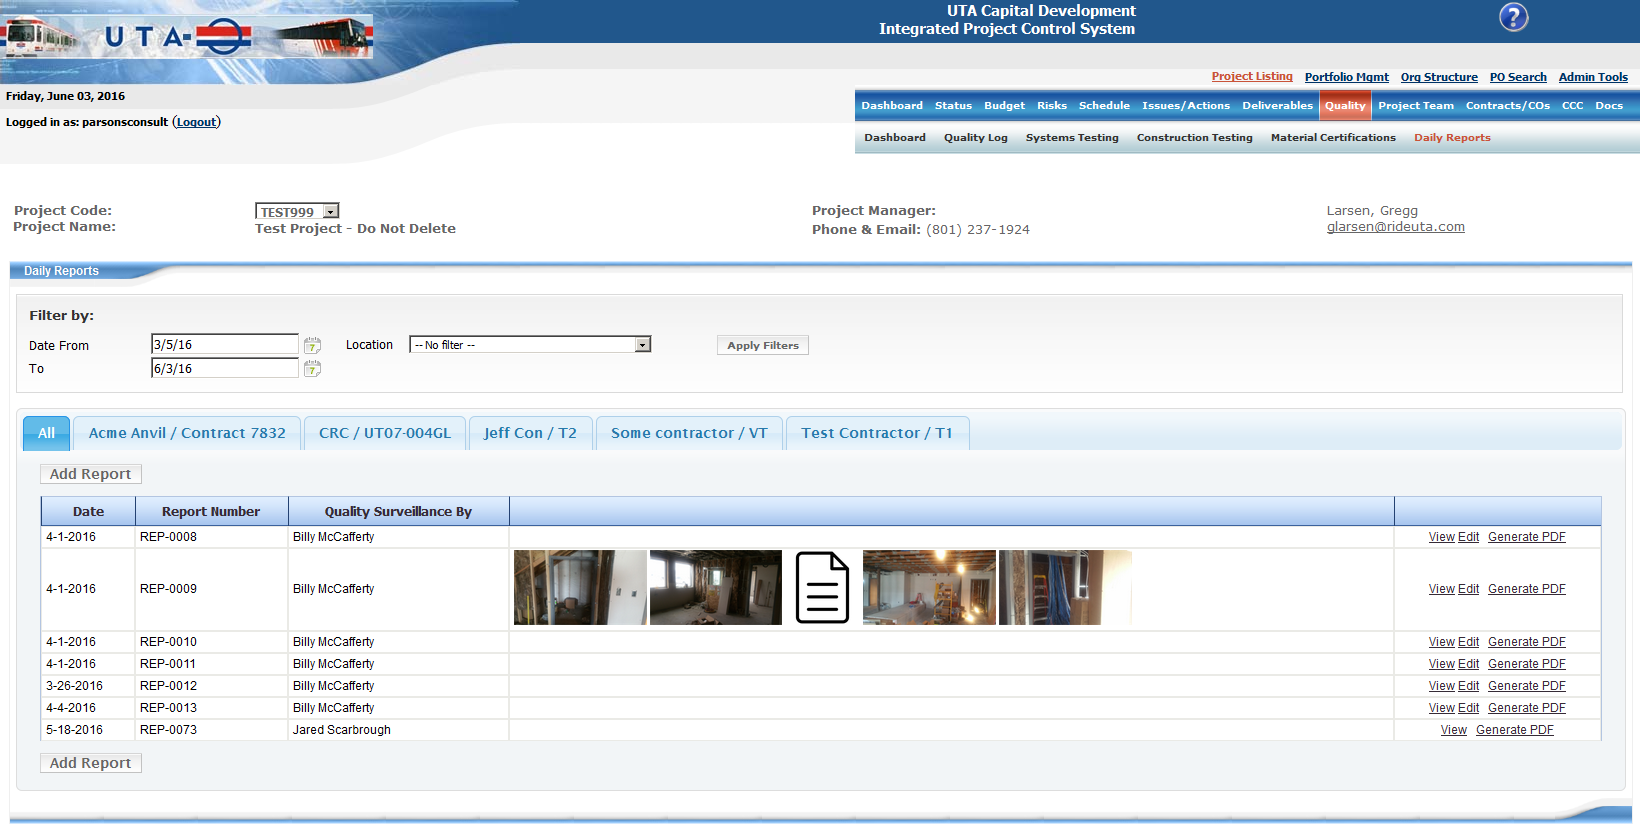
The "Daily Reports" page has three main sections within the body. Those are:
To help the user identify which project they are currently working with, project information has been placed near the top of the page.

You can use the filtering to narrow or broaden the results. By default, reports from the previous ninety days are shown.

Each contract may have zero or more reports associated with it. Each report has a report date, report number, location information, and other data. In addition, each report can have zero or more pictures or other attachments.
Reports are grouped by contract. The tabs at the top of the list reflect this. In addition to tabs for each contract, there is a tab for "All" reports. NOTE: Not everyone has access to view all reports. If you do not have access, you will not see a tab for all reports.
By default, "All" is selected. You can choose to view the reports for a specific contract or view all reports. Your tab selection will be remembered the next time you return to the listing.
Daily reports may have a number of attachments. If any of these attachments are images, the first five of those images will appear in the report listing as thumbnails. Clicking on these thumbnails will show a larger version of the image. To view the full list of attachments, click "View" or "Edit" for the report.
From within the list, you can (depending on your role) create a new report or view/edit an existing report.
You can create a new report by clicking "Add Report" from one of the tabs in the report list. This will take you to the New Report page. If you created a new report from a specific contract tab, that contract will automatically be selected for the new issue, though you have the option of changing it before you save. If you created a new report from the "All" tab, no contract will be selected by default.
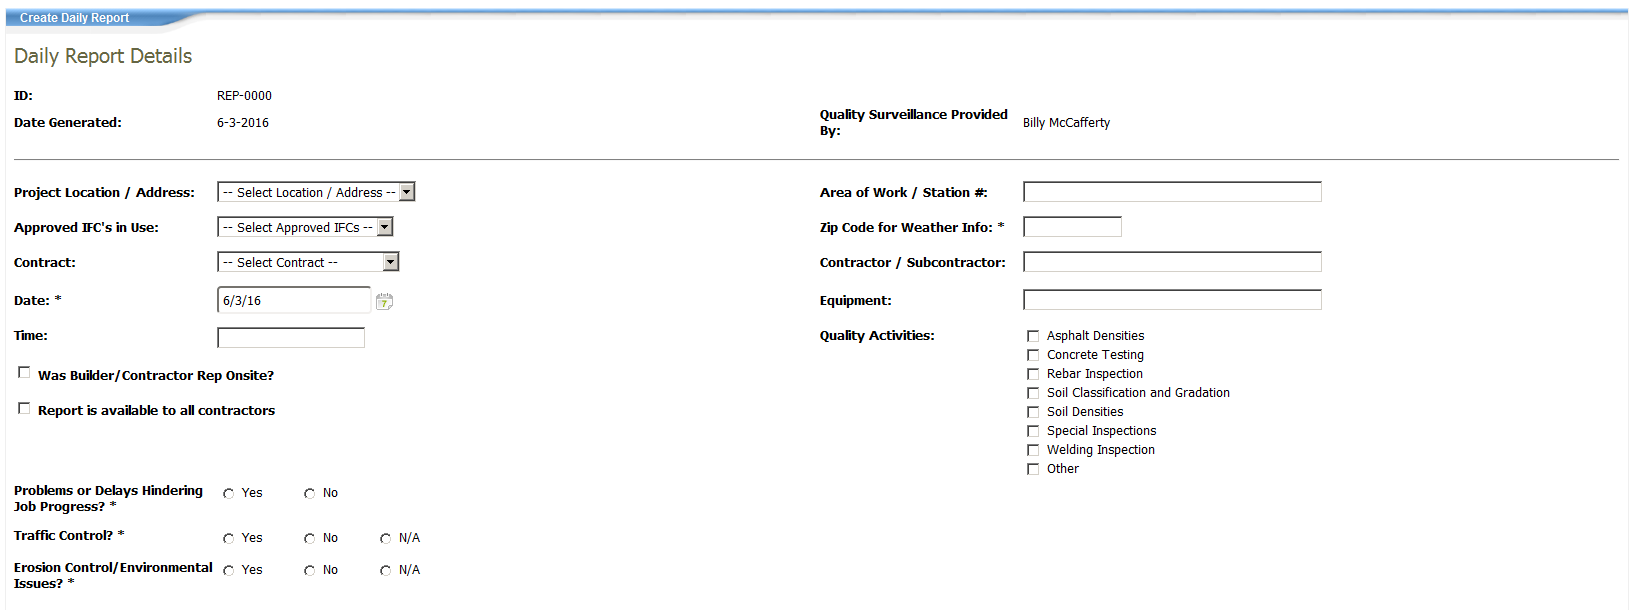
On the New Report page, the following fields are required:
For the Project Location and Approved IFCs in Use fields, you can select an existing option from the dropdown list. If the option you want is not included, select <Other>. At this point, you will be prompted to enter the name of the new location or approved IFC. This option will then be included in the list of options for future reports.
If you check the option "Was Builder/Contractor Rep Onsite", you will be required to select a builder/contractor from a dropdown list. This list acts the same as the Project Location and Approved IFCs in Use lists. I.e. If the appropriate option is not present, you can enter a new one by selecting <Other>.
To enter a signature, use the mouse in the signature box. If you are on a mobile device, you can trace a signature on the screen. In both cases, you must click "Accept Signature" before saving. If you would like to redo your signature, click "Clear Signature" before saving the report. Once the report is saved, the signature can not be changed.
By default, daily reports are not visible to contractors unless a contractor entered the report, in which case, the report is available only to that contractor (and UTA employees). If the report should be visible to all contractors, check "Report is available to all contractors". Note that this allows contractors to view the report only. Contractors do not have the ability to edit reports, even if they entered them initially.
There are three questions above "Work Activities". These are:
Selecting Yes for any of these options will show additional fields that can be filled in. If you select Yes for "Problems or Delays Hindering Progress?" you are required to give additional details. All other fields for these questions are optional.
The Work Activities field allows for limited formatting. You can make the text bold or italicized and you can provide a numbered or bulleted list.
If you check the option to "Generate Issue(s)", you will get the option to enter new quality issues. Only three fields are displayed for the issues: Title, Issue Type, and Discipline. When the daily report is saved, any issues you add here will also be created and linked to this report. You can then open those issues from the Quality Log page and provide further details. Note that the Discipline field acts like other dropdowns in that you can add a new option by selecting <Other> from the list.
Finally, you have the option to add attachments to the daily report. Most often, these will be in the form of images. When you click Add Attachments, a dialog will open where you can select files from your computer or mobile device. You can select multiple attachments from either. After selecting the files, you will see a preview of the ones you selected (if they are images) and you can provide an optional caption for each one. Note that captions can not be changed once the daily report is saved although you can remove the attachment and re-add it.
After completing the appropriate fields, you can click Save Report. If you attached images or other files, these will be uploaded first. Depending on the size of the files, this could take several seconds though you will see the upload progress. Alternatively, you can click Cancel to return to the report list without saving the report.
The Edit Report page is where you can update the data for a report with three exceptions. First, the signature can not be altered after the report is saved nor can it be removed. Second, although attachments can be removed and new ones added, you can not alter the caption of existing attachments. Finally, if you generated an issue related to the daily report, you can not edit any data related to the issue from the Edit Report screen. Nor can you remove the link to the daily report that generated the issue. However, you can edit the quality issue from its respective Edit Issue page in the Quality Log section.
This page also shows the full list of attachments for the report, including ones that are not images. Like the report listing, you can click thumbnails to view a larger version of the image. For all attachments, you can click on the filename to download a copy of the attachment.
The Edit Report page also contains an extra piece of data under the Zip Code. This is a short summary of the weather for the day of the report and for the zip code.

The View Report page is virtually identical to the Edit Report page in layout except that you can only view the data for the report, not change it. The attachment list works identically to the one in the Edit Report page.
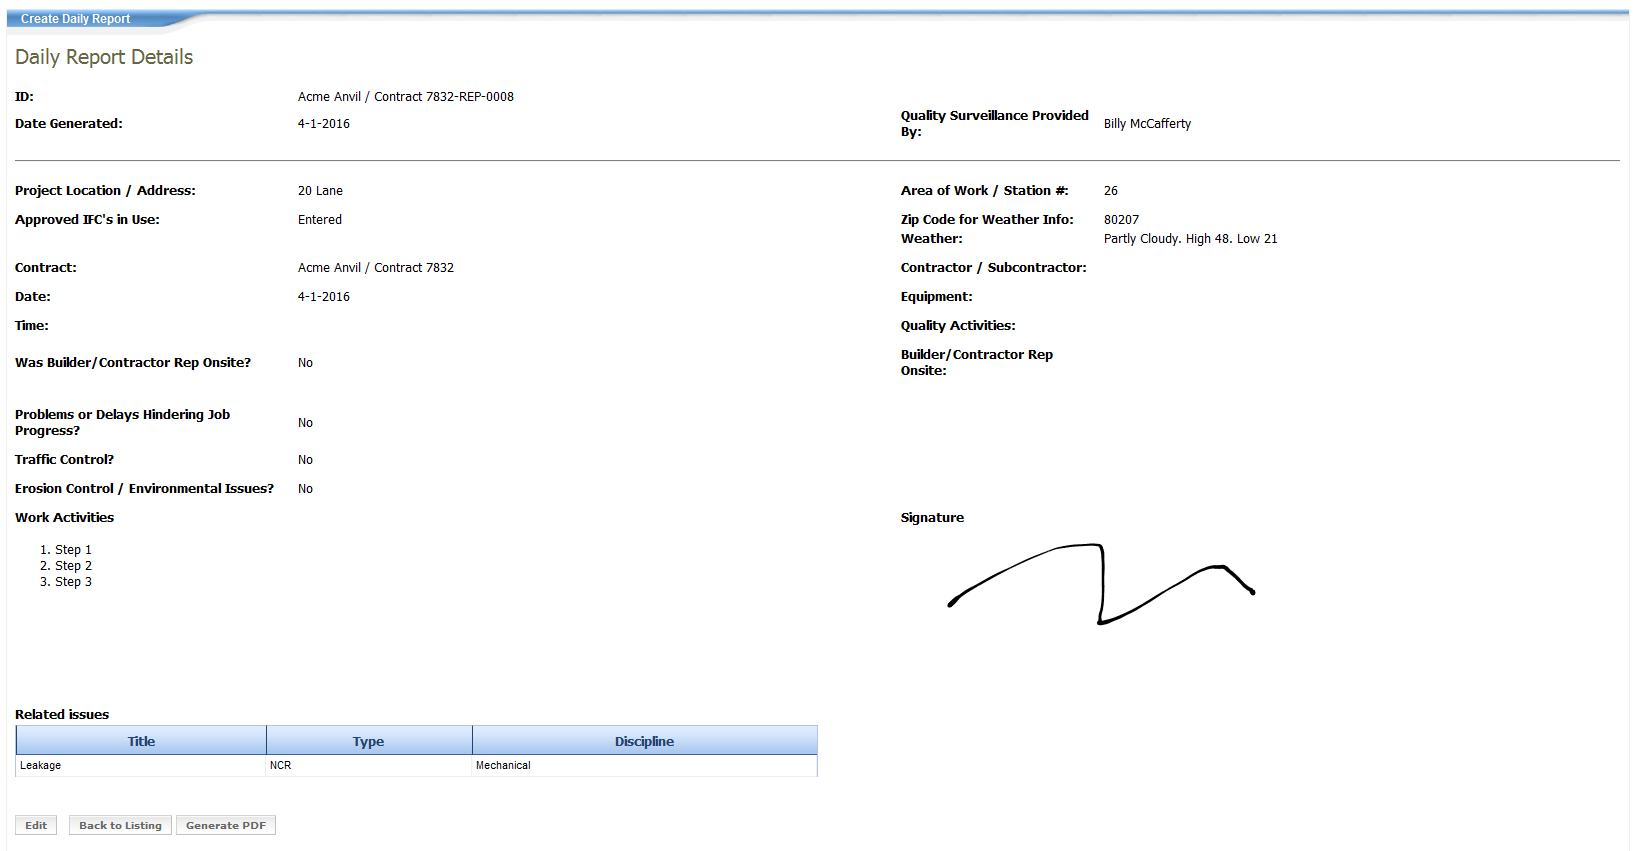
From the report list or the View Report page, you have the option to generate a PDF for the selected report. This PDF contains most of the data from the report and if there are any images attached, will list the images along with their captions.
Edit - Opens the page to edit the report
Back to Listing - Returns to the report listing page
Generate PDF - Generates a PDF representation of the report
Save Report - Saves your changes to the report and returns to the report listing page
Cancel - Discards any changes you've made and returns to the report listing page
<< Quality: Material Certifications | Portfolio Management >>